Joe's Spring Project Blooms in Chicago!


If you would remember, there's an earlier post on Joe's project A Mid-Winter RP1 Upgrade Project in Chicago , where he shared with us his exciting experiences in tweaking his RP1. Click the link to view........

So that was Joe's first "COOL" project in the cold season of Chicago! 

And now, in this New season of Spring, when flowers begin to bloom, his new project begins to bloom too.........

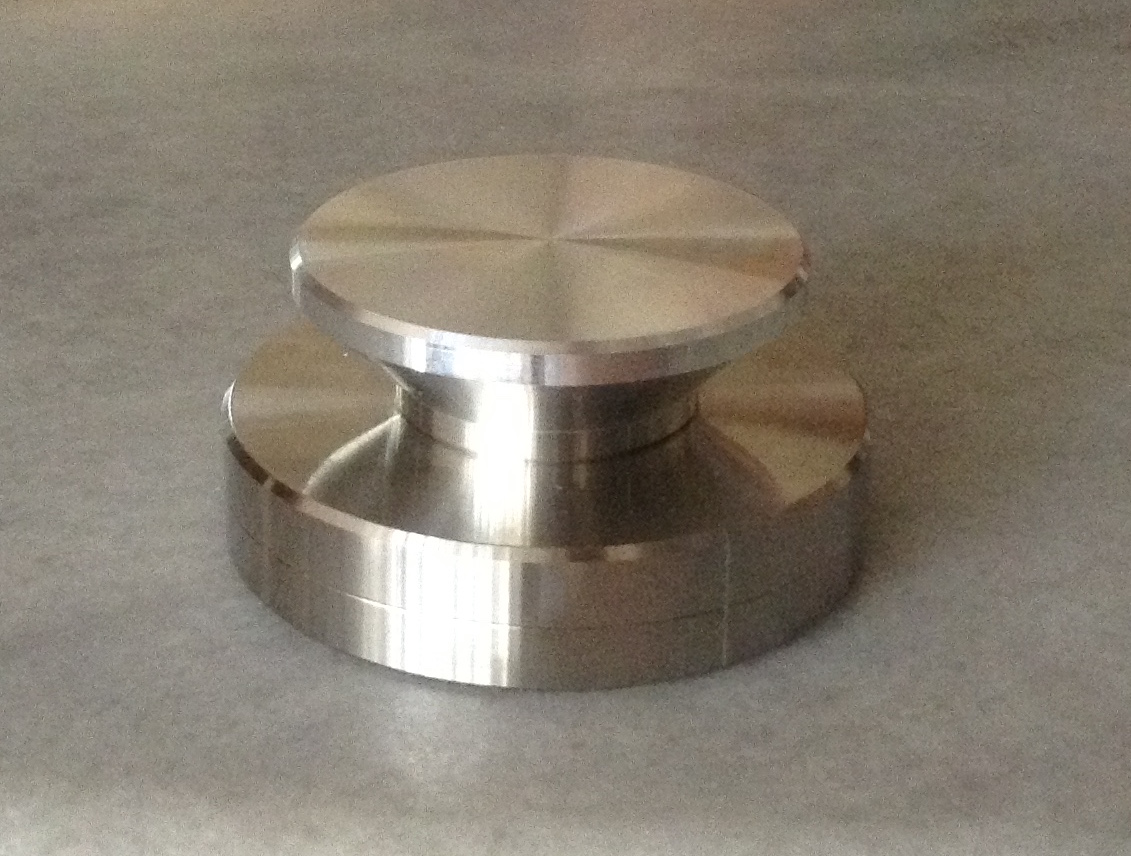
He has added several new upgrades which includes the latest top and bottom bracings. The stock RB101 tonearm is replaced with RB300 and added to it the underslung counterweight to good effect. Not forgetting to mention also the new RP1 is standing on "sandy" aluminium feet and it's "free" of motor vibration now with the new motor isolation base!  

Let's hear what Joe says:


Hi Michael, 

I'm happy to be sending you my notes and photos of the latest mods you sent me. During the winter I swapped out my RB 101 with a re-wired RB 300. I'm going to keep your VTA spacers regardless as I'll need them if I switch my arm back to a 3 point mount in the future. 

I first added the under slug counterweight to the RB 300 with an Ortofon 2M Blue, and after some listening tests before and after, I was surprised at the difference it made to the low end range. It made the bass sound more accurate and less muddy. I was surprised at how much of a difference just adding the weight makes! 

Step two was adding the next mods, the top and bottom bracings and motor isolation base. I'm not sure if it's one or the other or a combination of both, but these mods made my Rega sound like a different turntable! I simply was not expecting the impact they made to the overall presentation of the music. The added detail and resolution, increased soundstage, and dynamic impact are what I hear in very high end decks. 

Needless to say I am very happy with the results of adding your modifications and I'm sure I'll be hearing more resolution from my vinyl records in the months to come. 

I highly recommend that your readers add the isolation base. It seems difficult to add at first, but for what it adds to the quality of the music, it's well worth the effort, which is minimal in the end! 

Here are some pictures and notes:


Under-slug counterweight added to my RB 300 tonearm. 
I was amazed at how much this mod alone improved the resolution of my Ortofon 2M Blue, increasing dynamics, low end heft and adding a much more refined top end, even before adding the additional mods.


Bottom Brace: 
Adding it was a snap. Note I added washers before screwing back the feet. 


Adding back the aluminum feet after installing the bottom brace: 
A note about the inserting the rubber feet into the aluminum feet: I filled them with sand as recommended, then "capped" them with electrical tape, which contains the sand while adding back to the aluminum feet so no sand spills out. I also found that truncating the foot stub into an "hexagonal" type shape makes it much easier to insert them back into the aluminum feet!


Top Brace added: 
Note that adding the washer under the bearing tube was my mistake, as it's not needed! Also, I found, for my deck, inserting the bearing tube on top of the brace added height to the sub-platter, making it too high for me to align the silicone belts to the sub-platter in addition to adding the Isolation base mod. At least this was the case for me with my RP 1. Others may not encounter this issue, as Michael's top brace is excellent! I am passing on the following information about the next work around to others who are adding both the top brace and the isolation motor base to their RP1's.

Adding the top brace, continued: 
I found that I needed to widen the hole for the bearing housing as not widening it made it difficult to align the pulley belts with the sub-platter because the bearing housing wa now elevated slightly when inserted into the brace. This is most likely not an issue if one is not adding the isolation motor base. Here is the hole widened so that the bearing tube sits ever so slightly recessed from the surface of the brace. I used a conical drill bit to widen the hole which was quite easy. Not everyone may need to do this; however I found that for the RP1 it made it easier for me to adjust the belts, as the brace now does not add height to the bearing housing. When I added the isolation base mod which lowers the pulley, it gave me back the height I needed for the belts to align with the sub-platter. 


Motor Isolation base in place. I chose not to use the mesh, my preference; however, not using it requires extra care when moving the turntable! 


Belts in place : note 3 millimeter gap between motor and plinth. 


What a difference this makes in sound!


Final alignment of belts to sub-platter(Groovetracer); note that as Michael mentioned, having the belts align low on the sub-platter is fine, as it puts less pressure, over time, on the bearing housing. Even with my top brace "fix" this was the highest I could align the belts with the pulley at its top-most position for the hex nut to lock it in place.


Project complete! I added the cork-rubber mat. For my room, the mat and acrylic platter combo work well together. I don't know why, but it helps to focus the midrange and improve widening the soundstage.


Thanks Joe !

* Joe's other upgrade projects:
1. A mid-winter RP1 upgrade project in Chicago


Read Users' Comments ( 0 )


JohnMichael from USA has added both top and bottom bracings to his Planar 2. I am glad that the bracings work for his system. I couldn't be happier to learn that he is a happy customer with this new tweak.

Here's his pictures and comments:


Michael, 

I have been enjoying my turntable since installing your top and bottom brace. The sound is more solid and focused than before. I have also noticed the sound being less mechanical which I attribute to a reduction of vibrations. The soundstage is deeper and wider. Certainly a lot of improvement for the low cost of the braces. 


The first vinyl I listened to was a 45rpm recording of Adagio d’Albinoni with double-bass and organ. The double-bass was focused and not blurry as it was before the braces. The organ was now further back and filled the whole rear wall of my room. I was amazed at the difference. Next I listened to a record of Cleo Laine performing live at Carnegie Hall. I had never heard hall ambiance that clearly on my system and Cleo sounded much more flesh and blood then ever before. Every record I have listened to has benefitted in much the same way. 

I had only recently learned of your products and I am pleased you created your braces. My 14 year old Rega Planar 2 is sounding better than I expected. It had been tweaked before but the braces are a very nice step up. Thank you, 

JohnMichael


Thanks, JohnMichael !


Read Users' Comments ( 0 )


What about the 20mm acrylic turntable isolation platform for a Clearaudio Concept turntable?

Yes, it fis too!

Here's  the Audio system and Clearaudio Turntable of Bill Rosamond of Columbus, USA :


Thanks, Bill for the nice pictures!


Read Users' Comments ( 0 )


Ross Bull of Australia has a heavily modded P3-24 TT. He has included pictures of top and bottom VTA mount which I believe it's a tweak that not many have tried.

Take a look :


Hello Michael,

Sorry for not getting back to you with my impressions of your upgrades,I have been too busy playing records and swapping other components and upgrades in and out of my system. 

The first thing I noticed was the bass, so much tighter and more pronounced although never overbearing, in fact very addictive {I've never owned a sub woofer}. 

Next was the stability of sustained notes, I kept listening for that familiar wobble but its finally gone. GT reference sub platter and Rega white belt didn't fix it but your pulley and silicon belts did. 


Changes to upper frequencies initially appeared to be of a rolled off nature until I realised that it was the lack of smearing that creates this perception, the whole reason I got a GT acrylic platter was because the glass appeared to cause ringing and harsh high frequencies but now the glass is back and I'm using it without the felt mat! This sounded dreadful before but now sounds the best. These changes are the result of all the upgrades as I did not test them one at a time. I am very interested in what your isolation platform would do as well. Thank you

Ross Bull 


Here are the other upgrades which Ross has subsequently added to his P3-24 :
1. Motor isolation base
2. 3-points VTA spacers 
3. Acrylic isolation platform
4. Aluminium feet 


Drilling through the plinth and using the other spacer underneath:        
The more focused sound now has me wanting to hear a RB700 with its stainless steel base.


I am astonished at the improvement gained from aluminium discs being added to the feet of my Rega. The sound is noticeably more focused and nuanced.


Thanks Ross! 


Read Users' Comments ( 0 )

Juan Vega's "upgrade 1" for his P3


When it comes to tweaking turntable, many would ask what should I do first? What is the order of importance?

There are many schools of thoughts actually - quite subjective sometimes. But we just have to bear in mind, this is a hobby; a wonderfully hobby that we enjoy music, enjoy tweaking or enjoy both music and tweaking........, so there's no right or wrong in what we do. 

We might be a bit "nuts" as a friend has just told me. So be it, as long as we are happy!

Besides my own tweaking experience, many have also documented and shared with us in this blog their exciting journey in tweaking. Each system is unique in its own way. But as a whole, they serve as good reference for you who are joining in the fun!

Sharing with you here Juan Vega(from Mexica City)'s "upgrade 1" for his P3 TT:


Hi Michael,

Finally had the time to install the upgrades for my Rega P3, aluminum sub-platter; aluminum legs, and silicone belt. 

Two important things I wanted to share with you and your followers: 

a) indeed very easy to install, I had my doubts due to the fact that I am not that technically savvy but if I can do it, anybody can; and 

b) indeed a sonic improvement, tighter bass, and a noticed a welcomed gain that translated into a better soundstage, this with my favorite drum recording of Morello and Take Five. 

Now thinking of upgrade 2. Thanks again, and all the best. 

Attached a couple of pictures of my Rega P3 with updates.


Juan, 
Mexico City


Thanks, Juan!


Read Users' Comments ( 0 )

Bracing up ......


Surprisingly, it took only ten days this time for the braces to arrive in New York. Daniel Malito, the proud owner of this heavily-modded RP1 didn't take long to install the new bracings, both top and bottom. I am glad that he is happy with this new tweak! Here are the pictures and details of his system :


Mike, 

Here are the pics as promised!! Sounds great!! 

By the way I put washers under the original rega rubber feet to give the brace something besides rubber to tighten down with. 


Also I had to tap the bearing assembly with my rubber mallet to get it in.


Also I had to move the double pulley up a bit to accommodate the brace.


Here are all my mods: 

 Origin live silver tonearm 
 Groovetracer Delrin platter 
 Isosub gt sub platter 
 Lim double pulley 
 Lim silicon bands 
 Lim top and bottom braces 
 Lim extra big bearing nut 
 Groovemat 
 Rega 24v dc motor External TT psu


Now this 400 usd table sounds like a 4000 usd table.  Awesome. Thanks, feel free to post.

Daniel, 
New York, USA


Thanks Daniel!


Read Users' Comments ( 0 )

Another good idea here for you ...


Bradley of Alberta, canada shares with us here his NEW METHOD to mount the aluminium feet. Very good idea indeed! 


Hello Michael, 

I have installed my new aluminum feet and I am very pleased with everything, I really appreciate the quality of the aluminum and the milling, first rate all the way. I also like the new look it suits the turntable. 

I installed the feet a little differently, I inserted the screw into the metal foot as though you would when mounting them according to your method, instead of mounting them onto the turntable I put a piece of tape on the threads of the screw so that the screw is held in place. I then fit the rubber to the aluminum foot, placed a screw driver through the hole in the rubber fitting placing the screw driver in place, I then held the screw in place and took off the tape and then I screwed the aluminum foot into the turntable. The reason for doing it this way is it takes the stresses of fitting the metal to the rubber from happening while the aluminum fitting is attached turntable and puts it in your hands where you will not harm the turntable threads. 

Here is a photograph of of my turntable less a tonearm, it is out being serviced. Will certainly purchase some more items this experience was excellent. 

Regards, 
Bradley 
Alberta, Canada


Thanks, Bradley


Read Users' Comments ( 0 )

Related Posts Plugin for WordPress, Blogger...