


Adding a top bracing is an answer. But is it the end of the chapter yet? How to further improve the rigidity of the plinth without replacing it with solid and thicker plinth (still maintaining the "light plinth concept") sets me thinking...
May be it's always a good thing, from time to time, discovering something new to tweak as it makes my mind active. My eldest son often reminds me that mental activities help to keep one's mind in shape. So tweaking turntable could be a good way to prevent dementia, at least for a "young" retiree like me!
Do you call this "FUN" too? Of course it is to me!
Coming back to the bracing, the bottom bracing that I am introducing to you now might be a bit different from what you have been expecting. It's not "Rega-like" at all (who says it must be the same??) . Though the main concern that I am dealing with is still on the heavy loading at the bearing hub, the way to tackle here differs from that of the top bracing.

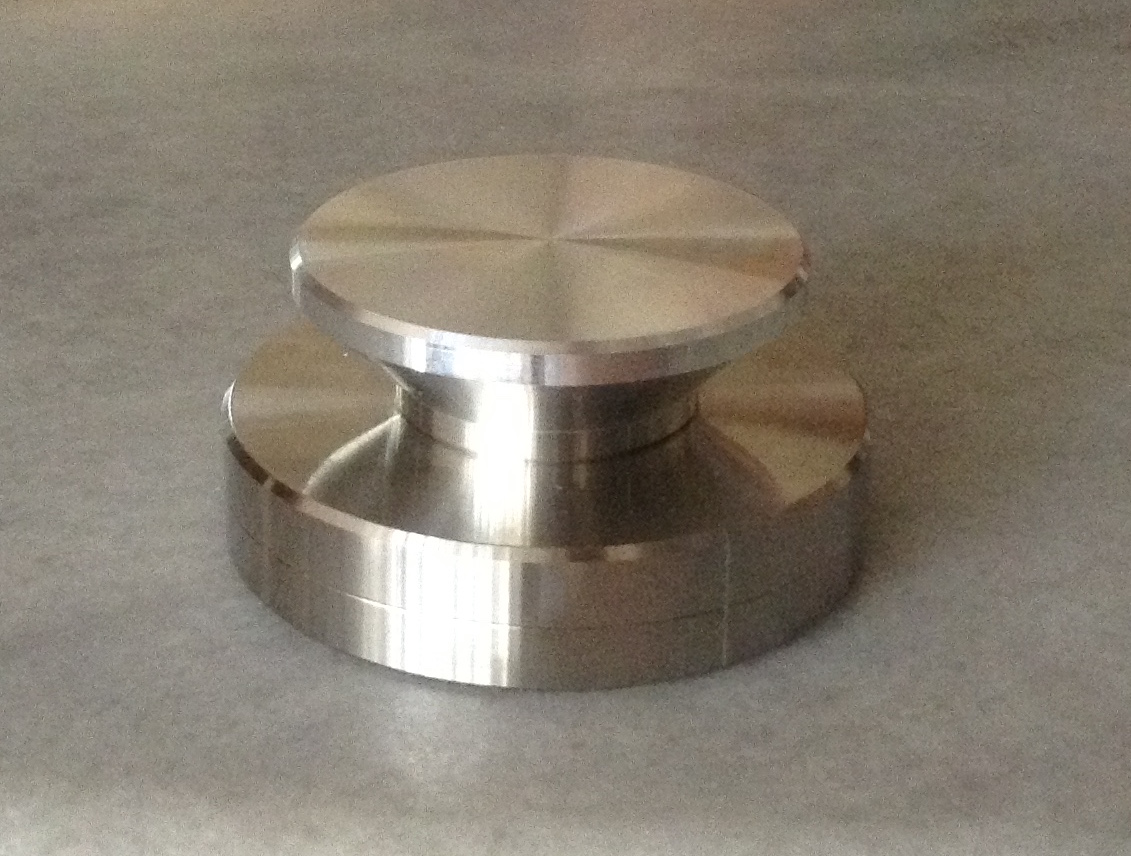
Stainless Steel Bottom Bracing
compatible with RP1, P1, P2, P3, P5/25, Planar 2/3
(Model BM1) - USD 60.00
* Also available in Black Steel (Model BM2-BLK) - USD60.00
* Also available in Black Steel (Model BM2-BLK) - USD60.00
My idea derives from here :
For any turntable, if the whole weight or pressure of the platter, sub-platter, record weight, record mat ... acts directly at the bearing hub, the plinth would tend to flex much more around this area as compared to the tonearm base. Further, over a long period of time, the bearing hub could sag due to the heavy pressure exerted (to what extent would depend on two things : the pressure at that point and strength of the plinth). Remember we are looking at a value smaller than the record groove undulations here. Hence, a bottom bracing to "prop up" the plinth where it matters most calls for this design of mine in the bottom bracing.
This stainless steel bottom bracing supports the plinth around the main bearing hub, linking all the three feet to form a non-magnetic, rigid skeletal frame underneath the plinth. It is to serve the purpose of restoring the vitality of your good old "tired" turntables.
Besides strengthening the plinth from below, it helps to dissipate "unwanted energy" away quickly from the main bearing hub so that less of this harmful energy remains in the hub and plinth. The sub-platter steel shaft also runs cooler in the main bearing hub due to faster heat conduction through the bottom bracing.
Now I have added both the top and bottom bracing to on my old Planar 2 turntables as well as my newer P2 and I am very happy with the results.
It's simple to implement (no drilling or filing is required). A suitable spanner and screw driver are all you ever need to do the job.
The bottom bracing works best with the top bracing which takes care of the rigid connection between tonearm and the main bearing hub and the aluminium isolation feet to bring about significant sonic improvement. However, it could also be used just by itself only.
Happy tweaking!
* Read more on >> Feedbacks on the bottom bracing.....


