Michael Lim Stainless Steel Disc stabilizer


               Model RC-ST  :   USD45.00
               Weight : ~392g ( ~13.8 oz)
               Height : ~31mm (~1-7/32")
               Diameter : ~ 63.5mm (~2-1/2")
               Spindle hole depth: ~25mm (~ 1")
A stabilizer is used to provide tighter coupling of disc to the turntable. It's even more so for slightly warped records. 

As we know disc stabilizers come in many forms and shapes in addition to different materials. And for this disc stabiliser, other than the weight (lower section) is of stainless steel, the handle is made of light weight alloy. It's designed so to reduce the weight in the inner segment which would improve the moment of inertia when the platter turns, without adding unnecessary extra burden to the main bearing. 

It is able to accommodate top spindle height of up to 25mm(~1") and will not damage the stylus in the event that the cartridge knock against the stabilizer weight when the needle runs over the record label.


Read Users' Comments ( 0 )

Sean's DIY project .....


Sean of California has just completed his new DIY TT project.

Beautiful, isn't it?


It's almost a completely new TT now with all the upgrades:
- stainless steel dual pulley
- aluminium sub-platter
- acrylic platter
- bronze bearing hub
- tonearm stabilizer
- motor isolation base
- acrylic isolation platform
- braced acrylic plinth and Audiomods tonearm.

Here's Sean's feedback :

Hi Michael. 

I was finally able to get the table together. I was waiting on the custom arm. Everything worked except the VTA adjuster but that's going on my other table. Audiomods included their VTA system for free. 


It looks great and sounds fantastic. The "Rega sound" is still there but it's much more like an P9 and P10 than a P3 due to the massive improvement in accuracy and dynamics. Also that instant start up is quite amazing and speed is spot-on

Thanks again! 

Sean


Thanks Sean!


Read Users' Comments ( 1 )

Peter - Acrylic Plinth Upgrade on My Rega RP3 TT


Add some colour to your TT with this acrylic upgrade!

How about the feel with the result of this upgrade?

Hahaha.......  Peter of Australia will let you know the answer here:

Hi Michael. 

I initially purchased an aluminium sub-platter, to which I fitted 2 Rega White Belts, and an acrylic platter from you about 4 years ago and was very happy with the sound it was producing. 

Recently, I was browsing through your blog and came across pictures of Ralf's braced acrylic plinth (with red top) and adjustable aluminium feet upgrades. 

It was too tempting to ignore! I had to do it to mine too. 

Your well secured package arrived within less than a week to Australia. Other than some initial confusion on my part about the on/off switch no longer being required and the TT-PSU now becoming the on/off switch, everything ran smoothly. 

I have included some before-and-after pictures to show my new look Rega RP3. Not only does it sound sexy…it looks sexy as well!!


This is the “before” shot
Braced acrylic plinth (with red top)
New plinth fitted with the aluminium sub-platter (previously bought from you)
fitted with 2xRega White Belts.
Finished product with new acrylic plinth and adjustable aluminium feet,
acrylic platter (previously bought from you),
SRM/Tech Silicone Platter Mat
and Ortofon 2M Bronze stylus
I think my next step will be to add an acrylic isolation platform. 

Many thanks! 

Regards 
Peter Sherriff 
Ulladulla NSW Australia.


Thanks, Peter!


Read Users' Comments ( 0 )


VTA adjuster
Model : VTA-HN-3-point
USD58.00
Some cartridges, especially MC cartridges, are sensitive to vertical tracking angle (VTA). For more precise tracking, an adjustable VTA is the dream for many. And here is the good news; I have just designed a new VTA adjuster particular to meet this requirement of yours.

The new VTA-adjuster (as you can see from the picture above) is for the 3-point mount tonearms (e.g RB101/RB251/RB301/RB303). With this adjuster, the VTA can be adjusted starting from 1.5mm onwards (with any desirable incremental value) to the correct VTA you require (within the limit). 

Besides, I have also designed the VTA adjuster  to retrofit the existing 25mm(1") diameter tonearm mounting hole for RP3/P3-24/RP6 turntables. Hope it would be a good and easy upgrade for you and your beloved TT's.

So from now on, VTA problems that follow after a cartridge change would not be a headache to you any more.

Here's the installation on my RP3 with RB303 : 


Read Users' Comments ( 13 )

Tom Owen's acrylic plinth upgrade ....


Upgrading a turntable with your own unique ideas is not just a hobby. You will be amazed by the wonderful end result you get! 

Welcome to join in this great hobby and let the beautiful music it brings brighten up your days!


Take a look at the pictures of Tom's upgraded TT here with braced black color top acrylic plinth, outboard motor isolation base and bronze bearing hub.


Enjoy! 


Hi Michael. 

First impressions are that the parts are of high quality fit and finish. This was proved by the ability to transfer parts from the original table to the replacement; all parts fit the replacement base without modification. The table itself is a work of art! Absolutely beautiful. 

The motor isolation base fit the replacement motor without problem. My original motor mounting was via a rubber band which was located by the factory bending the two locating tabs on the motor itself. All that was required was straightening these flat. Once done, the motor bolted straight onto the base without problem. The supplied shims allowed me level the drive pulleys. All in all, it works well. 

I chose to extend the wiring from the motor to the control board. I cut and spliced an additional 8 inches of wiring so I could locate the switch and control board off to the side of the turntable. I was careful to include strain relief at both ends of the wiring extension. Wiring was covered in heat shrink. 

Overall this is a 9.5 out of 10. Well done.

Here are a couple of pictures.


Thanks Tom !


Read Users' Comments ( 0 )

John Gallup's RP3 upgrades


It's a breeze to remove and install the dual pulley - John just took 10 minutes to get it done for his RP3! 
If what makes you shy off from this upgrade is the whole process involved in installation of the pulley, then the assurance is here! 

Michael,
Here are a couple of photos of my RP-3 with your products installed.

Stock pulley removed...came off easily with your puller and some acetone:


Here are the belts in place on your pulley and a GrooveTracer subplatter:


The whole process took about 10 minutes.

I installed your adjustable feet a few weeks ago. This is the Rega turntable platform, with a sheet of MDF added to act as a heat shield--my amp is right beneath it, and the aluminum duct tape on the bottom of the MDF keeps the heat away from the turntable motor.


 It's a pleasure doing business with you!

 John Gallup


Another upgrade for John : Motor isolation base
Michael,

These arrived yesterday and were installed today. I believe I can detect improved bass response from my RP3 (which also has your adjustable feet, double belts and pulley, and a number of other tweaks). Listening right now to "Neil Young Live at the Cellar Door," I feel a stronger presence and intimacy to the performance. I don't recall what other users have reported but the improvements more than justify the modest cost of the base.


I was very impressed with the quality of the product, and with the clever engineering that re-uses existing parts to make installation pretty simple. It took me about an hour and half, and quite a bit of that time was spent peeling of the remnants of the double-stick tape that held the motor to the plinth. 

Here are a couple of thoughts on the installation process that might be of interest:
1. I was surprised that nothing I saw on your website or in the instructions you sent mentioned the requirement to cut the existing power switch wires and solder them to the new switch. I'm not the most skillful solderer but this was simple enough.
2. The leads on the motor wires limit the distance from the motor isolation base to the PC board box. Everything worked, but reaching the little switch might be a problem for users who don't switch the TT on and off elsewhere.
3. I use Rega's wall-mounting bracket, with an MDF board in the open space between the three foot platforms and the rails supporting them. Fortunately the isolation base falls within the perimeter of the rails.
4. Included in the kit was a white foam disk about 100 mm in diameter. I still haven't figured out what that is for.

Keep up the good work!

Regards,
John Gallup
San Diego California USA


Thanks John!


Read Users' Comments ( 0 )

This is the newest stunning tweak by Mark Nettleton of Australia.

You may not believe you eyes. But let me tell you, " It's true, you are seeing 6 belts on 2 motors!"

Who says you can't do wonders on Rega TT's?

Enjoy!


Hello Michael, 


here are the pics as promised,although this summary is some what belated. it was around 2 years ago i got the urge to do some tweaking to my all Rega hi fi system,i was looking at an overseas electronic hi fi modifier to do some mods on my Rega Saturn cd player,but the thought of sending it in the post turned me off,the damage that could occur while in the transportation was a worrying factor,also the trend in digital music is moving away from cd,is it a worthwhile investment?

1 day i was scrolling through the net,and i came across Michaels blog page,and noticed all the mods that were done by the fellow tweakers,i had a Rega P2,and really only it played on nostalgic moods,and i really didn't notice much difference at all when comparing it with the Saturn cdp.so with the resurgence in vinyl i bit the bullet and brought a few things at 
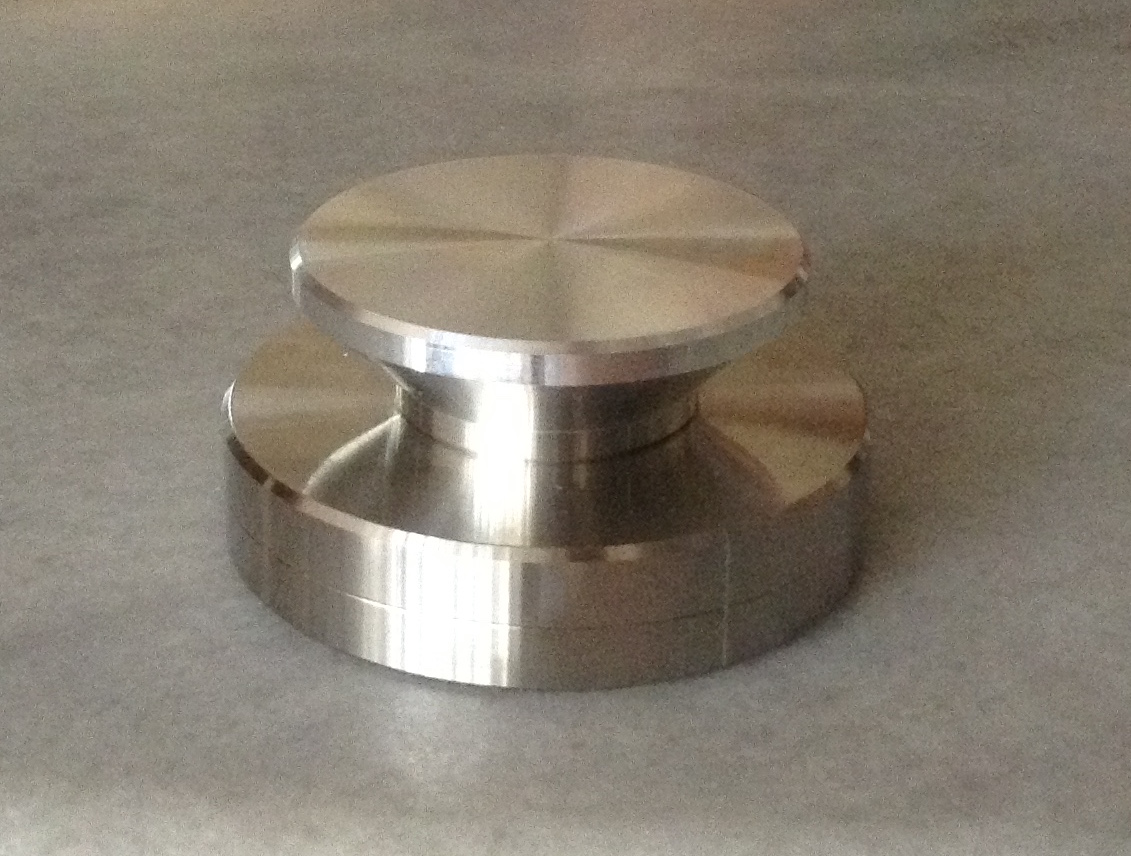
first,namely the sub platter,under slug and cwt.,top and bottom brace,aluminium feet,2 red belts,and double pulley,i could immediately hear a difference when the sub platter and cwt was installed,as for the bottom brace i don't know,as i did not test this individually,also i forgot to order the pulley remover,so i couldn't hear the difference there,so i made another order from Michael ,with the pulley remover and the motor isolation base,again i didn't test the pulley by itself,because i removed the motor off the stock mdf plinth,and placed the motor on Michael's isolation base and heard no background noise,wow,know i am finally hearing what all the fuss is about vinyl.

so you would think it would stop there,no not for me ,their where other things that Michael had,and i understood the modification items that Michael had on hand to achieve vinyl nirvana.next was the acrylic plinth that could accommodate 2 motors,and also another isolation base,another double pulley,and 2 more red belts,all this in place,with another aftermarket platter,and a ortofon blue cartridge certainly gave me a a wide 3 dimensional detailed sound,and a rewired Rega 251 tone arm from isokinetic. 


did i stop there? no,,next was a cartridge upgrade from ortofon,the bronze,beautiful.

have i stopped ?no,i was curious to hear what a dual motor with 2 triple pulleys with 6 belts would give,so i ordered the ALSP-FS6 sub platter,and 2 triple pulleys,and 2 more red belts,upon receiving the new sub platter a problem has emerged,the current a/s platter i have is completely flat not recessed underneath,resulting in the tone arm in the wrong geometry,i then put the stock p2 platter on that is recessed underneath,this corrected the problem,but was like having a hotted up car with the best wheels ,then putting the cheapest tyres on,so another order to Michael,with the his version of the Rega rp6 acrylic platter,and also ordered his new bronze bearing,the bronze bearing has eliminated noise that i didn't know was there,the overall result is with the extra 2 belts with the triple pulleys are concerned is like driving a car with an extra gear,(more oomph) able to give you extra power if needed    


my tt is probably now a hybird p2/rp6,and that is heavily moded,


to say i am satisfied with Michaels products and service is an understatement,because Michael was ever so obliging in everywhere possible,in problems which i came across during the installation process all i had to do was email Michael about the the problem,so quick was his response was like having him look over my shoulder,and directing me what to do,before i was a novice in this field to say the least,and don't have the confidence to tackle just about any where in this field,also the after service Michael provides is 1st rate,and i have no hesitation in recommending Michael,but has my journey come to end now?no,next project a mono tt. 

Thank you for dedicating your retirement for us in this field.


All the best 

Mark


 Thanks Mark!


Read Users' Comments ( 2 )

Goran's upgraded RP6


Goran of Sweden has upgraded his RP6 with various mods. With great satisfaction he shares his experience in tweaking his beloved RP6 in detail here. Enjoy reading!


Hi Michael, 

Now I’m finished with all the Mods :-) 


Adjustable feet was a necessity for me as you can on my pictures, A wall mounted rack is very difficult to get exactly horizontal in all direction so the your feet housing came very handy and it looks good too. It was easy to install, but I was little confused when assembled the adjusting nut and feet housing separately they were very wobbly but together the tighten up against the tap nicely and makes the correct friction against each other. The original rubber feet went in to the housing with no problem. As it is now I keep them without any filling. Sonically, I can’t hear any noise even if I tap on the glass shelf. 


The Underslunged counter weight was quite easy it only requires good tools. The exact pickup delivered with the RP6 is very light so I had removed all extra weight knobs and the got it right. 


The Sub-platter with the ceramic bearing and 3-belt pulley was easy to install. I didn’t even have to remove the motor, just tugged puller between the plinth and the pulley. 


The last but not least was the Motor Isolation Base. Removing the motor from the plinth was easy and the sticky double glue tape is easily taken off from the motor stand. Following the instructions and trying measure the height for the pulley gave a hint of much extra shimming you need to do. Before the try out you need to put the cover for the motor control card and in my case I had take away some material to get the snug fit it’s something you might end up do because of the soldering on the card.


It turned out during the fitting of the base I couldn’t use the white circular pad it was too high even with no shims. So I use the the 3 rubber pads which came with the package. To get the correct setup with the Base and control card tricky but eventually you will find the position. With all in place after several try outs I was able to hook up the belts and aligning the pulley. Now I was able give some tension on the belts which in fact got a better run on the table. 

Was it worth the money and the trouble? 

Yes absolutely, the solid Subplatter is such a nice piece of metal handcrafted with knowledge and care and that also goes for the rest of the mods. 


Musically I can say sitting and listen to Daftpunk new album RAM and ”Within" which start with a solo piano is just amazing to hear the sound it’s so elegant and relaxed and controlled. It just gave me goose bump listening and the silent parts are really really silent absolutely no rumble or hiss just quite as the black night. 

This was a nice journey to take a good product to be a lot better. I just love enthusiasts in the world. Thank you Michael for your effort and knowledge for us out there with the same passion as you. 

Goran Magnusson RP6 ML Edition

 ———————————————— 
Best Regards, 
Goran


Thanks Goran!


Read Users' Comments ( 1 )

Gerret 's vta adjuster and finger nut upgrade


VTA adjustable is a new upgrade that I have added to my list recently. Gerret has just installed it onto his Rega turntable. He also shares with us his experience in upgrading his Rega turntable. 

Take a look!


Michael, 

This may be an odd thing to say, but the VTA adjuster is gorgeous. It is very well made and fits so snug that I am thinking anyone with a "traditional" mount Rega arm should have one just to make the arm mount more precise. 


The true reason for choosing it in my case is the future update to a Dynavector cartridge and this will require VTA adjustment. 


I attached some photos of my turntable to show the upgrades to date. 


It started as as a Rega Planar 2 and slowly moved into what it is today. Starting with an RP3 would have been easier in retrospect, but also more expensive. 

Changes include - in order of change: 
 - End stub replacement to metal stub and weight (Britaudio) 
 - Record weight (Audio Technica) 
 - Feet upgrade (Michael Lim) 
 - Sub-platter upgrade (Tangospinner) 
 - Plinth Upgrade (Audiowood) 
 - Motor Upgrade to 24V (Rega) 
 - Double 45 pulley (Michael Lim) 
 - Double belt upgrade (Michael Lim) 
 - Music Hall Speed Control 
 - Delrin Platter (GrooveTracer) 
 - VTA Adjuser & Finger Nut (Michael Lim) 


 Some funds were recovered by selling the glass platter and old motor. 

 I am now close to the end of this journey with the cartridge change being the next to final step. If the wiring in the arm gives me trouble that would be the final one. 

Michael, thank you for your inspiration and great products. 

Kind regards, 
Gerret Meyer 
Johns Creek, 
GA, USA


Thanks Gerret!


Read Users' Comments ( 0 )

Related Posts Plugin for WordPress, Blogger...