Removing the Rega P5 Pulley ......


Sharing with you here a picture of the dual pulley installed by bacobits on his Rega P5 TT.


Pictures - courtesy of bacobits, North Carolina


I am really glad to hear from him that there is significant sonic improvement after changing to the stainless steel dual pulley and it's worth his effort.


However, to remove the stubborn glued-down aluminium pulley from the motor shaft took him quite some time and effort. If only the puller he purchased (just for this purpose) didn't fail to work ....., job could be much easier, I think .....


Let's hear what he says in vinylengine forum:

"The small gear puller I purchased was not usable because the original Rega Pulley will not fit into it. See pict. Per Michael's direction I carefully used 2 same sized screw drivers, and it worked, go slowly. I used some Acetone on a cotton swab, not soaked, dabbed the top of the old pulley, let it set a few minutes. I also had paper towels around the shaft of the motor to not get any down the shaft......"


Yes, go slowly. Patience is what we need here.

And the next concern when removing the pulley is : will the motor be okay?

Actually as long as we do it carefully, increasing force slowly and evenly using the two screw drivers (taking care not to apply lateral force), the pulley would definitely "surrender" to you! The motor would be fine too. In fact you don't have to worry too much; I find that Rega motors are hardy!

For those of you who are using Rega Planar 2/3 , P3 & P25 with the plastic pulleys, you are lucky because over time, the glue has deteriorated and it is easy to pull out (even by hand).

So it's worth the effort as he says in vinylengine forum:

I was going to wait but these are first impressions I heard immediately. 

First noticed pace of songs picked up PRAT and a lot of it. Some of Rega's PRAT might have been lost in the other upgrades, maybe the platter?? It's all back now. Worth the price of that alone. 

Piano will show this immediately, I listen to a fair amount of piano. Bob James, Joe Sample,Dave Grusin, Dan Siegel, etc. 

One Particular album that is really hard to sound right on a TT Is Bob James, Hands Down. The song is Janus. If the table speed is not correct, wow, flutter, and speed will show on this song. CD sounds fine as does the Turntable now especially with this dual Pulley. Very natural sounding piano. A single white belt did this too but not as much as this. Who knows the double pulley might be machined more accurately, but it is there. 

You can hear the PRAT and slam on Herb Alpert's Fandango album. Just excellent! 

Things do sound more "human" as someone else stated. Just toe tapping good. Instrument and musician separation is nice. Voice breathy, real sounding. Sade, Diamond Life Album. 

So I think the mod is worth the trouble.


Thanks, bacobits!


Read more >> on various pulley pullers for removing pulley ......


Read Users' Comments ( 1 )


Serrated three-point VTA spacers suitable for Rega tonearms
(RB100/101/202/251/301/303/330/RB700/900/1000)

0.5mm - USD 6.50
1.5mm - USD16.50
1.9mm - USD17.50
2.3mm - USD19.50
2.8mm - USD22.50
3.4mm - USD24.90
3.8mm - USD25.90
2mm - USD18.50
4mm - USD27.50
6mm - USD38.80

Since for three-point VTA spacers, most of the requirements are more than 2 mm and less than 4 mm, our three-point VTA spacers come in three sizes : 1.5mm, 2.3 mm, 2.8 mm and 3.8 mm. However, a new size of 1.9 mm is now added to the range for those who prefer 2 mm or less! Also available 0.5mm spacer for fine VTA tuning.

It's also unique because it is serrated !

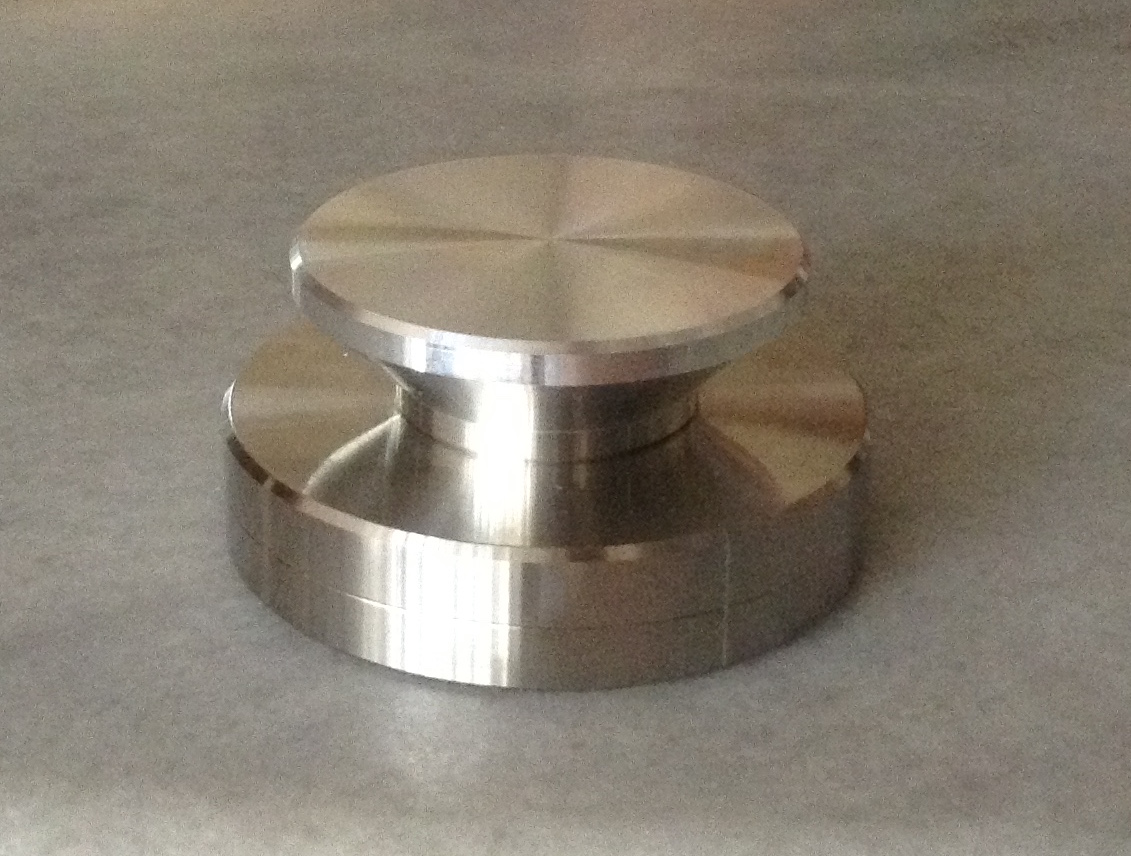
You may be puzzled to see from the picture below that the spacer is serrated at the end of the three legs ! And you would ask..... why serrated?


Top view

This is because these serrated parts, combined with the jagged edges serve to enhance the anti-resonance property of the spacers (or adjusters).


bottom view


This 3-point spacer also has the advantage over regular spacers in that the three points are designed for minimum contact area with plinth(picture above), hence better isolation from vibration. You can see from the bottom view that it's precision milled to two levels reducing the contact areas to minimum, hence less vibration is transmitted to the tonearm from board.


Designed for RB700, RB900, RB1000 tonearms, they are especially suitable for use on RB100, RB101, RB202, RB251, RB301 and RB303 tonearms as these tonearms originally are also mounted on 3-point bases (plastic ones). Changing to stainless steel spacers would increase the rigidity compared with the original all-in-one plastic VTA spacers.


What about using these spacers with RB250,RB300 and RB600 tonearms? The answer is - Yes; just use as drop-in spacers without having to drill any hole at all. With the 3-point stainless steel VTA spacers on RB250/RB300/RB600, you'll get the "semi-decoupling effect" of RB101/RB251/RB301/RB700 tonearms and yet retain the advantage of "hand-tightened" nut of RB250/RB300/RB600.


*For best performance use only one piece of suitable VTA spacer, not two or three pieces of the spacers stacked together.


Step by step to install a VTA spacer ( e.g. on Planar 3 TT):


Loosen the tonearm cable clip.


Turn the adjustable spanner anti-clockwise to loosen the tonearm hexagonal nut in order to remove the RB300 tonearm.


Now you can remove the nut by hand.


Remove the tonearm from board.


Put the serrated 3-point spacer in place.


Put back the tonearm and hand-tighten the nut (+1/4 turn). The serrated stainless steel spacer now semi-decouples the tonearm from board while maintaining the rigidity.


For tonearms with 3-point base, you may want to try this tweak :


1. You would require:
- 3 pcs M3x50mm screws
- 3 pcs butterfly nuts

2. After removing the wooden screws and tonearm, drill (3.5mm) hole straight through the plinth


3. After fixing the 3-point spacer and tonearm, hand tighten the butterfly nuts(+ 1/4 turn).


It's simple; try it out yourself ! You will hear the difference !

Further to the above tweak, you may also try this :

Adding another 3-point spacer below for even better isolation and rigidity.


* In case you can't get the M3x50mm screws and butterfly nuts, I can include 3 pcs of them with your order of VTA spacer for additional USD3.00:


Add-on to the 3-point VTA spacer : USD3.00
3 pcs stainless steel M3x50mm screws
3 pcs stainless steel butterfly nuts
3 pcs stainless steel washers


Read Users' Comments ( 4 )

Silicone Belt suitable for Rega turntables


Silicon belt (model SB1) -USD20.00


Take a look at this silicon belt; it's neither black nor white; it's red, adding lively color to your TT!


" It doesn't matter if a cat is black or white, so long as it catches mice. "
- famous quote by Deng Xiaoping, former strongman of China.


Yes, it doesn't matter what color it is; it's the SOUND that matters.....


Red Silicone belt, custom-made for TTs' 


Double Pulley and silicone belts - this set of tweaks added a ton of authority and brought the oomph and quickness back into music......


Alex's comment:


Just replaced the standard belt on the RP3 with the silicon belt. First impression is that the bass has firmed up giving more body ....


FWIW I am using belts from Michael Lim for Planar 3. Excellent quality, spot-on diameter for accurate speed. They are of the same quality IMHO for US$20.00 as the infamous Rega branded "white belts" for a lot less than white belt pricing.They're the natural material colour-not coloured white or black. Probably due to no additional retail seller involvement plugging another $xxx.00 profit margin on top... Also I highly recommend the Michael Lim double pulley for 33 1/3RPM. Huge improvement in speed stability over the original plastic pulley. Cheers all. Cairne4me


Read Users' Comments ( 4 )


Thrust bearing assembly-ball bearing height adjustable 
(Model TB1 - USD12.95)

What is a thrust bearing? And how to check if your turntable motor has a thrust bearing?

The pictures below will show you the difference :


A motor without thrust bearing / A motor with thrust bearing


Many of the older turntables (e.g. Planar 2, Planar 3 TT) or even some new models of the Rega(e.g. Rp1, P1, P2 TT's), Pro-ject and Linn TT's do not come equipped with motor thrust bearings.


Planar motor without thrust bearing


P1 motor without thrust bearing


RP1 motor without thrust bearing


But in some other higher Rega models (e.g P3-24, P5 TT's), we find that the motors have thrust bearings built-in.

P3-24 motor with thrust bearing


P5 motor with thrust bearing


RP6 motor with thrust bearing

Should we overlook the importance of this small motor thrust bearing?

We might not know that without this thrust bearing the motor spindle(and pulley) tends to oscillate up and down as there is a vertical free play of 1 mm-1.5 mm. And this has hence resulted in speed "inconsistency'' when the pulley rotates.

By adding to the motor this thrust bearing consisting of a high quality lubricated ball bearing resting on a suitable spring in a plastic housing, the motor spindle(& pulley) runs steadier, smoother and quieter as there is much less or negligible vertical movement. The spring also absorbs some of the resonant energy of the motor spindle. The end result is a noticeable sonic improvement.


Planar 3 motor fitted with TB1
thrust bearing


Installation of the thrust bearing is simple; it's press-fitted onto the bottom part of the motor after adding one or two drops of light lubricating oil to the ball bearing.


This thrust bearing upgrade is also suitable for those models of TT's (e.g Pro-ject and Linn) which are using similar motors ( e.g. Philips, Premotec and Airpax etc ).


Read Users' Comments ( 2 )

Related Posts Plugin for WordPress, Blogger...