Rega P5 TT upgrades - Here's the answers....

I have been touching on upgrades on Rega P1, P2, Rega Planar 2 and Planar 3 TT's so far. And though I have mentioned that these upgrades are designed to offer similar benefits to higher models like P3, P5 TT's ....., many turntable enthusiasts are curious to find out from me whether any Rega P5 user has upgraded his P5 turntable and observed marked improvements?

Recently, I visited a Rega P5 TT user who had upgraded his turntable. I am glad to learn that he is happy with the improved sound of the upgraded Rega P5 TT. The following photographs (taken at the courtesy of the P5 TT owner) show the various upgrades:


Read Users' Comments ( 4 )


A Rega P1 user after viewing my earlier post on "Simple steps to improve or upgrade the Rega P1 (& P2)" was puzzled why I did not include the motor isolation base upgrade as an option for the upgrade? Is it not necessary?

Actually when I first introduced these upgrades to fellow enthusiasts, I only began with simple plug and play items only. And this motor isolation base upgrade, though it is simple, it involves some basic dismantling and installation work which requires DIY skill. So I have left this more adventurous part out until we are ready to go one step further!

After my comparison test between Rega Planar 3 motor upgrade and the motor isolation base, IB22, recently and obtained the result that the "old higher vibration motor" on IB22 isolation base out-performed the Rega's low vibration motor fixed to the plinth with double-sided tape (refer to my last post of motor upgrade), I feel that I should highlight this important option to all Rega P1/P2/P3/P5 users also. If you are serious on improving the sound of your turntables, remember that the motor vibration is a major factor impeding the performance of turntable. By removing the vibration from the plinth "completely", you give a major fillip to the sound of Rega P1 .

How to do it? It's quite simple and there is no drilling required.

Here are the detailed steps (refer to my earlier post on "Motor vibration isolation base") :

1. Make sure that the AC power supply is switched off and pull the AC plug out of the electrical socket .


2. Remove the motor compartment cover.


3. Since the motor is fixed to the board (plinth) using double-sided tape, a little strength is required to pull it off the board. Be careful not to break the motor wires soldered to the small PCB (printed circuit board).

4. Remove part of the double-sided tape which covers the flange of motor to reveal the mounting holes (not necessary to remove all).


5. Use the screws provided to fasten the motor to the stainless steel motor base. Apply force evenly on both sides by tightening the screws alternatively.

6. Put the motor/motor base back into the motor compartment and cover the motor compartment with the rubber mesh netting provided. Secure the rubber mesh netting using existing cover screws such that there is a slack of 7mm-8mm. Make sure when the turntable (in upright position) is lifted up from the table, the motor pulley stays within the 20mm hole.

7. Align the pulley in the centre of the hole, making sure that the motor is 1 mm-2 mm below the board, not touching the bottom surface of the plinth.


Now you are ready to enjoy the improvement of your upgrade!


Read Users' Comments ( 2 )


In my last post on "motor upgrade kit and motor isolation base ", I have explained in theory, the difference between these two concepts and the expected results.

But someone asks me again, " Have you tested them side by side to confirm?"

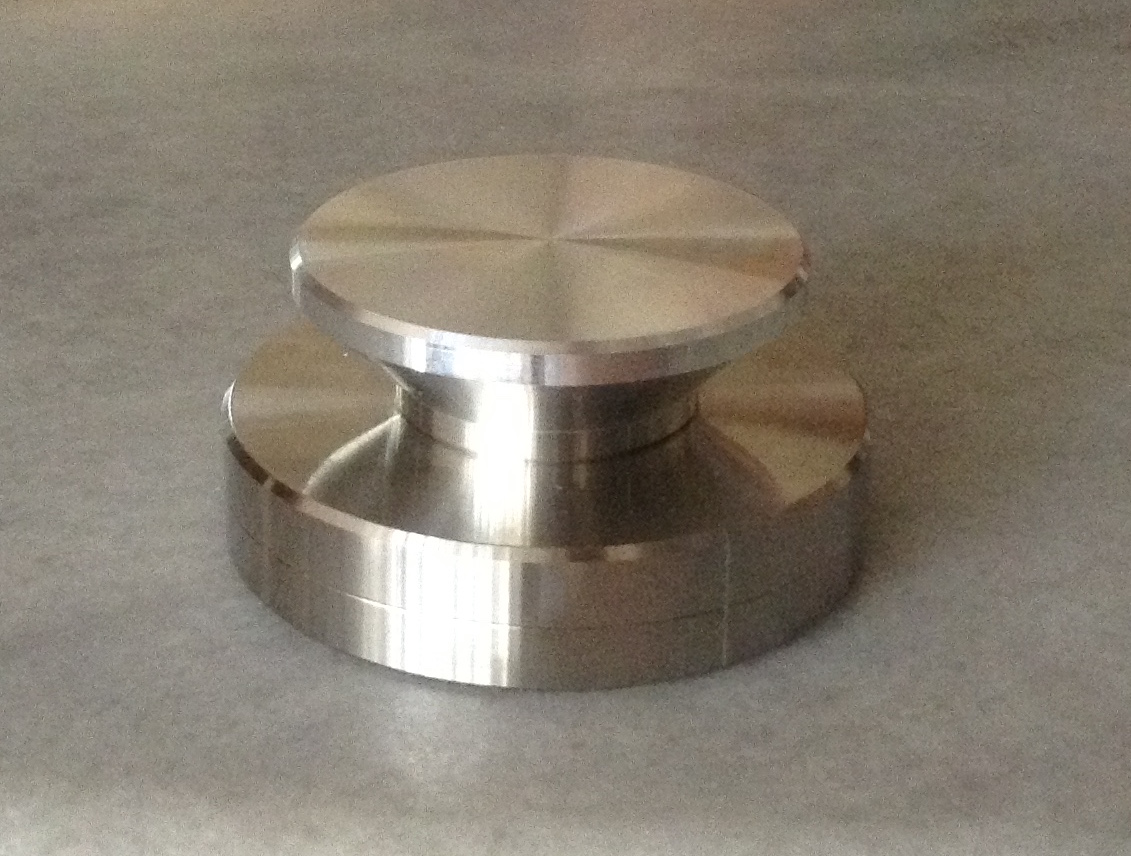
Well, when I designed my motor isolation base (model IB22, suitable for Rega /Pro-ject turntable ) what I had in mind was just to find a way to isolate my motor vibration completely from the plinth. I was happy and satisfied after I had done it. It didn't occur to me that I should make a comparison with the motor upgrade kit, until the above question popped out .....

I think other enthusiasts are also curious to find out the difference (in terms of final sound effect/quality) in order that they can make a better and wiser choice in upgrading their turntables.

Since I have two sets of Rega Planar 3 turntables, it's easy for me to carry out the following tests:

A) Using Rega Planar 3 TT with Rega motor upgrade kit ( Black Rega)

I got hold of a Rega Planar 3 motor upgrade kit (an upgraded "low-vibration" motor complete with a small printed circuit board-called PCB in short). After desoldering and dismantling the 'old' motor (including the PCB) from the Rega Planar 3 turntable (with a Stanton 680 II cartridge), the new PCB was soldered and new motor was fixed back to the plinth with double-sided tape.


B) Using Rega Planar 3 TT with motor isolation base and metal pulley upgrades ( White Rega)

As for the other set of Rega Planar 3 (white in color) which was identical, I had the "old" original "higher-vibration"Rega motor removed and mounted to my motor isolation base, IB22, which was in turn held in place by a rubber mesh using existing motor compartment cover screws. The shorter Rega rubber feet were replaced with slightly bigger and taller ones. Next, the plastic pulley was replaced with a metal (stainless steel) one.


During the tests, I made sure that these two units of Rega planar 3 TT's were using the same acrylic platter, aluminium sub-platter and underslung counterweight, tonearm as well as cartridge i.e. I switched them over to the other turntable so that all components used were identical...

The result I obtained was : the white Planar 3 TT with the motor isolation base was the clear winner with natural, sweet, warm and clearer sound when I played Roger Williams' "To Amadeus with Love" and Skeeter Davis' ''Love Takes a lot of my Time''.


The black Planar 3 TT sounded fairly good after the motor upgrade but not as good compared with the white unit with the motor isolation base upgrade. The background noise level was higher and it sounded more "muddy".

So one fact we can clearly see here is: as far as this "fussy" turntable is concerned, small vibration still matters (even though it has been lower) as the stylus is capable of picking up!

A simple way for you to figure out what I am trying to convey here - just try touching the plinth surface area immediately above where the motor is mounted and you could feel the low vibration of the motor when the motor is switched on ( with the platter removed of course).

The motor isolation base is a very good vibration sink as well as a heat sink for the motor to run cooler and last longer. It offers far better value for money ( "no vibration") than the motor upgrade ( low vibration) as tested.

So even Rega P1, RP1, P2, P3, P25, P3-24, P5 TT's etc with low vibration motors would also benefit tremendously with this motor isolation base upgrade.


Read Users' Comments ( 0 )

Motor upgrade kit and Motor isolation base


A Rega Planar 3 user asks, "Is it necessary to upgrade the Rega Planar 3 motor upgrade kit after I have used your motor isolation base?"

Before I answer his question, let's take a look at the difference between the motor upgrade kit and motor isolation base. By motor upgrade, we mean to change the higher vibration motor to a lower vibration one. And motor isolation, as I have posted earlier, is to detach the motor from the plinth without changing the motor itself. In both cases, we try to to minimize the "motor vibration" that reached the tonearm and record surface through the wooden plinth/board (Rega motor is attached to the plinth).

In my design, the motor is not only removed, separated from the plinth, it is placed on a independent heavy vibration isolation base so as to absorb the vibrations produced. The motor now runs steadier and cooler too. As a result there is tremendous sonic improvement.

So do you think you need to fork out another USD 200.00 or more to upgrade the motor ? Bear in mind that the end results of upgrades to the turntable are as follows:

i) Motor upgrade : lower vibration to the plinth


ii) Motor isolation : effectively "no vibration" to the plinth using the motor isolation base.


Do I answer your question?


Read Users' Comments ( 1 )

Why the need to upgrade your turntables, Part 2


What about the tonearm?


In my last post (Why the need to upgrade your turntables, Part 1) I mentioned that I personally prefer not to touch the tonearm wire as I consider the replacement of tonearm wire a specialist job unless it's absolutely necessary, i.e. when the wire has become the weaker link between the turntable/tonearm 'combo' and the phonostage/amplifier.

Care must be taken to choose the right tonearm wires for replacement. If the wire is too thin with high impedance it would cause signal attenuation whereas a thick or stiff wire would retard the movement of tonearm. Either way the end result will be poor sound quality.

When do we upgrade the cartridge?


I would upgrade the stylus/cartridge only after I have exhausted all possible upgrades on the 'turntable proper' and tonearm.

Why? You may ask. This is because to me the stylus/cartridge is one of the most 'expensive' upgrade for a turntable. Moreover, it is a recurring cost for every 800 hours. So find out first whether the turntable deserves a better cartridge. The cost of replacing stylus/cartridge often could be much more than the humble turntable itself.

Go for a cartridge just as 'capable' as the turntable is the logical answer. That's what I usually do as there is no point spending money to buy a cartridge more capable (also more expensive) as it could not out-perform the capability of the turntable.

I would normally test first before deciding on the 'right cartridge' to 'match' the turntable. For example, if my turntable comes with an Ortofon OM5e cartridge, I would first test it with OM10e. Then do likewise for OM20e, OM30e and OM40e until no significant improvement is shown. So the 'right' stylus/cartridge combo is : the one preceding the last one. You may try the newer Ortofon series from 2M Red to 2M Black.

As for Grado cartridges, I would try Grado Black first, followed by Grado Red and the Grado Silver or Gold etc.


What about the Phono-stage or Phono-preamp?


The signal level produced by the cartridge is very low, in the region of several mili-volts(~5mV) for moving magnet(MM) cartridge and even much less (~0.2mV) for moving coil(MC) cartridge. Therefore phono-stage or phono-preamp (a preamplifier) is specifically designed for the record players or turntables to boost the signal produced by the cartridge to the required level. Another important function of the phono-stage is to provide RIAA (Recording Industry Association of America) equalization which is essential for proper reproduction of sound/music by the amplifiers and speakers system.

Some amplifiers come with built-in phono-stages and thus external units are not required.

A phono-stage should be as capable as the turntable/cartridge combo. Anything more would be a waste of money. You only need to upgrade when it becomes the weak link.


Read Users' Comments ( 2 )

Related Posts Plugin for WordPress, Blogger...