There's more than one way to skin a cat !


How to remove Rega pulleys? An often asked question.

The answer is : there's more than one way to skin a cat ! Let's see:

My pulley just popped off under finger pressure and I can refit mine if I wanted to.

I popped the plastic pulley on my P2 with flat of a screwdriver twisted to exert pressure and it came off fairly easily.

alternately and this is the hack method!! get two flat blade screw drivers seated between pulley and motor and then....

I carefully used 2 same sized screw drivers, and it worked, go slowly. I used some Acetone on a cotton swab, not soaked, dabbed the top of the old pulley, let it set a few minutes. I also had paper towels around the shaft of the motor to not get any down the shaft.....

When I took off my pulley I put a paint scraper under the pulley to protect the plinth. While I applied heat with a mini torch-directly on top of the pulley, I gently pried upwards with a fork and it came off lickidy-split.


From my own experience, the plastic pulley of Planar 2/3 can be pulled out easily (by hand) without even a drop of acetone. Really easy. But for Rega P1 and above, we would require some kind of tools to pry out the pulley(after applying some acetone or nail polish removal). For aluminium pulleys (P3-24 and P5 ), it's even more difficult and applying some heat may help in this case.


And today we have good news from Thomas of Denmark!

He is going to share with us the professional way of removing an aluminium pulley using the proper pulley puller:


Instructions :

Function of the puller :
When turning the big metal cone in the middle, you can change the distance between the two jaws of
the puller and make them have a firm grip in the pulley groove. At the end of the center spindle, you
can put an old 2.5 mm diameter sawed-off drill bit (or anything like that). It fits perfectly to the top of the
motor spindle which is approx 2.8 mm in diameter. After tightening the jaws to the groove of the pulley,
and centering the drill bit to the top of the motor spindle (eventually use fingers to keep it centered), it
only takes a few turns with the puller - and the pulley is up and away!
Remember first a little drop of acetone.

So with this little device:
No fiddling with screw-drivers!
No scratches on the plinth surface.
But most important: No harm to the motor, spindle or bearings.
After having removed the stock pulley as described, I turned on the motor, and it was immediately
spinning just as smooth and quiet, as it always has been.

Where to buy the device:
I am sure, you can buy the puller in stores, where they sell repair tools for cars or bicycles.
The amount (here in Denmark) was just around 35 USD (200 DKK).
This is cheaper than a new motor :-)

I hope, these few guidelines will be a help to upcoming "upgraders" of Rega decks.

Thomas Nielsen
Silkeborg
Denmark


Thanks , Thomas, for your generosity to share with us the pictures and instructions!


Read Users' Comments ( 0 )


I am glad to receive a mail from Thomas Nielsen of Denmark that my stainless steel double/dual pulley has brought more "PRaT" to his Rega P3-24 turntable.


Thank you Thomas, for allowing me to publish your comments to share with others.

Hi Mr. Lim!

A few days ago, I received the double pulley for my Rega TT.

Luckily I could borrow a "professional" mini-puller where I work (a fire-department in Silkeborg), so it was very easy to pull off the stock pulley, without any harm to the motor.

And I must say, that I am very pleased with the result:
Rotation is now rock stable, and maybe for the first time I have recognized the meaning of PRAT. I know, it's said before - but I hear more "layers" in the music, and more than before, I can not only hear, but almost physical "see" through the speakers and into the recording studio!

Strange?? But that's a fact!

I am sure, I can now look forward to many joyful listening sessions!

Best regards

Thomas Nielsen
Silkeborg
Denmark


What is "PRaT"?

"PRaT" stands for "Pace, Rhythm and Timing".

"PRaT" is definitely not new to any audiophile as in music appreciation and enjoyment, we always hear audiophiles talk about the "musicality" of their systems in terms of "PRaT". The more "PRaT" is taken to be better of course! (And many have chosen Rega turntables also because of Rega's "PRaT" factor).

"PRaT" also looks like an important parameter to audiophiles for "measuring" the system they are "listening" to. The same is true in tweaking and comparing turntables.

I am an engineer and technically speaking, in music appreciation, I don't know exactly what parameters to use in measuring it, until someone throws some light on this concept that I am always curious about ....

When the music is on, how do you react to it?
Toe-tapping....with the music?
Head nodding.....with the music ?
Feel like humming and dancing along..... with the music......?
Simply want to listen and enjoy more.... and more..... of the music.......?

Your emotions....your feelings......

Yes, your emotions and feelings will tell you the answer .....


Read Users' Comments ( 0 )

Tips on upgrading Rega Planar 3 ......


A popular turntable in the 70's, Rega Planar 3 is more than thirty years old now. Leaving the age aside, it does not lose out to some of the new Regas in appearance and in performance. If we were to compare, we would find Planar 3 and the new models not only basically look similar, there's not much difference in design and construction other than the upgraded motor in later models.

Many analog enthusiasts today still regard Planar 3, with 18 mm diameter heavy duty main bearing housing, a good-sounding turntable and would rather restore or upgrade a Planar 3 than to get a new RP1, P1, P2 or even P3........ . If you have a Planar 3 or Planar 2 that's not modded, here's the tips for substantial sonic improvement with simple upgrades!

In this post I am going to show you step by step upgrades for a Rega Planar 3 turntable since I have received many enquires particularly on motor base upgrade for this turntable. I will also include all other possible mods for easy reference at a glance. Hope it would be helpful to those who are going for these Planar 3 tweaks.


i) Changing the pulley :


For most Planar turntables, the pulley which is glued down on the spindle is easily removed by hand as the glue has deteriorated over time.


Fix the stainless metal pulley ( standard or dual) after applying a bit of light oil on the spindle. Tighten the set screw with allen key.


ii) Removing the motor :


Unscrew the two black screws to loosen the motor mounting bracket. The motor which is held by rubber band to the bracket is now loosely cradled within the motor compartment by the back cover.


Now we need to overturn the turntable to work on the motor. Before doing so, make sure to :

i) remove the platter
ii) lock the tonearm.
iii) place a piece of cloth (or any soft material) of sufficient thickness on top of the the sub-platter to block the sub-platter and bearing from falling out when the turntable is turned over.


With the cloth in place, close the lid. Put the turntable upside down on the work place such that it rests on the lid.

(Put some newspapers or soft material on the surface of work place to prevent the plastic lid from being scratched.)


When turned upside down, the sub-platter stays in place together with and ball bearing. No messy mishaps like lubricating oil spills out or ball bearing goes missing.....


Open the motor compartment using a suitable screw driver.


Now you can see how the motor is held by elastic band to the plinth and what it's meant by the motor "sways (wobbles) with music" which results in speed inconsistency and affects the performance of the turntable.

Remove the motor mounting bracket and elastic band.


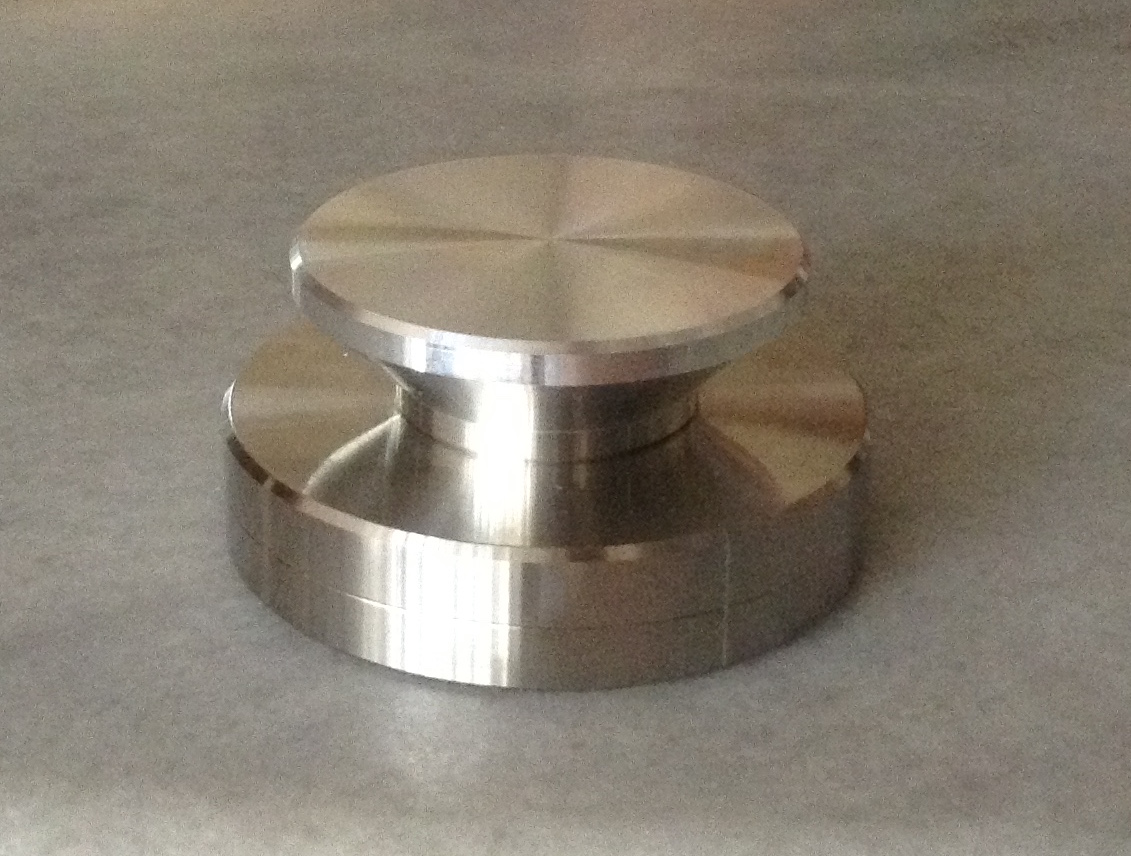
iii) Fixing the motor base and thrust bearing :


Bend the motor flange upwards using the pliers such that it is level with the top surface. No need to be perfect.


Before we go to the motor isolation base, snap in the thrust bearing to the bottom of the motor after adding two or three drops of light oil. It's simple (as shown in the picture).


Tape the motor wires with electrical insulating tape for insulation as well as preventing the motor vibration from reaching the board.


Place the motor onto the motor base and align the mounting holes of the motor flanges with the thread holes on the base. Use the screws provided to hold the motor tightly in place.


Remember to tighten the screws alternatively between the motor flanges to ensure even pressure being applied on both sides.


Use the plastic bracket and the screw to hold down the rubber mesh netting on one side first (next to the brass bearing housing) before putting back the motor base/motor.


Put the motor back to the motor compartment. Affix the cork stickers to the motor base as shown. Cover and secure the other side of the rubber mesh netting with plastic bracket and screw. The rubber mesh netting should be a bit slack (7-8 mm) such that in upright position, the motor is not touching the plinth and the pulley stays within the pulley hole when the turntable is lifted up .


Change the original rubber feet to the new taller ones as shown. You may use the original mounting screws .


Alternatively, you can upgrade to aluminium feet (à la P7/P9) using existing rubber feet for better turntable isolation.


Turn over the turntable now. Align the pulley in the centre of the hole making sure the whole assembly (pulley+motor+motor base) is not in contact with any part of the plinth.
The pulley grooves (and the belts) should aligned within +- 4 mm higher or lower from the centre of the sub-platter.
Put the silicone belt on to test.


Fine adjustment in pulley height might be required to align the pulley with different types of sub-platters you used. Stainless steel or brass washers (50 mm( 2") x 2 mm) could be used between motor and motor base to adjust the height of pulley assembly if necessary.


Step 2 : Upgrading to aluminium sub-platter and acrylic platter


Replacing the original resin sub-platter with anti-resonance aluminium metal sub-platter is a breeze. Remember to oil the stainless steel shaft with suitable lubricant before inserting it into the brass bearing housing.


I am sure everyone knows what to do with this 24 mm acrylic platter.


Loosen the tonearm cable clip and turn the adjustable spanner anti-clockwise to loosen the tonearm hexagonal nut in order to remove the RB300 tonearm.


Remove the tonearm from board. Put the serrated 3-point spacer in place. Put back the tonearm and hand-tighten the nut(+1/4 turn). The serrated stainless steel spacer now semi-decouples the tonearm from board while enhancing the rigidity.


Lastly, fix the anti-resonance adaptor for counter weight with allen key. Adjust the underslung counterweight with help of a stylus tracking force guage.


Step 4 : Sit back now and treat yourself to some wonderful music.......


Besides the above upgrades, you may add a suitable isolation platform of your choice.

Now you have a capable audiophile machine to enjoy beautiful analog music. It will sound as good as many more expensive models of turntables you find in the market!


Happy tweaking!


Dirk Lötsch of Hannover, Germany has tweaked his Planar 3 and he commented:
"Now, all the items (Motor base, dual pulley, silicone belts, aluminum feet and thrust bearing) are installed (takes about 1h) and it sounds fantastic (great mids and straighter bass)!"


Glen Nuckolls of Massachusetts, USA, has tweaked his P3-2000 and he commented:
"1) No more wow from the bend in the white belt. 
 2) Speed seems very stable. I have not been able to hear any "macro" pitch issues, meaning, to me, no audible pitch fluctuation. Basically no wow. I am no longer frustrated with records! I was getting to be quite good at hearing very subtle pitch fluctuations. 
3) The turntable is more quiet and clear. It seems easier to hear and enjoy the music at both low and high volume levels. At higher levels, it's easier on the ears and at lower levels its easier to hear. 
4) All the important musical stuff better: instrument timbre, attack, detail. 
5) Sounds like I went up to a better class of turntable. 

Overall, I'm very happy with the improvement and I think it was a good value for what I got. "


Read Users' Comments ( 2 )


Unlike the other earlier models of Rega turntables, including its predecessor P25 TT, P5 turntable comes with a different pulley. Its aluminium metal pulley does look better and it's believed to perform better than the plastic ones also.

But by replacing the aluminium pulley with stainless steel dual pulley and spinning the sub-platter with higher energy and hence steadier speed using twin silicone belts, many P5 owners discover great sonic improvements in P5.

Take a look at Fabio's Rega P5 upgrades using stainless steel dual pulley and silicone belts :


Picture : courtesy of Fabio of São Paulo, Brazil


Here's Fabio's feedback on the stainless steel dual pulley and silicone belts upgrades :

Hi Michael,

What can I say, after two weeks using the dual pulley + silicon belts upgrades is that the improvement is stunning!!!

Reaches full speed more quickly and remains there.

When the music starts, everything is well defined and sounding like it should.
Excellent separation of instruments. Piano and string instruments sound very clear.
One of the best upgrades available for Rega tables. No doubt about it!


Best regards
Fabio


Thank you, Fabio !


Read Users' Comments ( 0 )


A) Removing the end-stub :


i) Plastic end-stub (RB100, RB250 and RB 251)


First remove the steel counterweight by turning it anti-clockwise until it is completely out.


Next, hold the end-stub firmly and unscrew it gently out of the tonearm. Make sure the tonearm is locked before applying force to the end-stub.


ii) Metal end-stub ( RB300, RB301, RB600, RB700, RB900 and RB1000)


Tools required:
i) WD40
ii) a pair of slip joint pliers as shown (most suitable)
iii) a piece of thick rag


Remove the stainless steel counterweight first (refer to above). Spray some WD40 at the joint between the end-stub and the tonearm. Wait for several minutes for chemical to work its way into the thread.


Then cover the end-stub with a piece of thick rag. With one hand holding the tonearm firmly, the other hand grabs the end-stub with the pliers and turn (as shown in the picture) anti-clockwise with enough force to loosen it.


Normally one turn is enough to loosen the end-stub. However, for some stubborn units, you may need to make one extra turn in order that it's fully loosened to be unscrewed out by hand. Spray a bit more of WD40 if necessary.


Fix the new stainless steel end-stub by turning it clockwise until hand-tight.


Install the adaptor tube and lock it with the Allen key provided.


Slide in the stainless steel underslung counter-weight.


Adjust the VTF ( vertical tracking force) by moving the weight to-and-fro along the tube. Lock it at the right position.

( A stylus tracking force gauge is required here.)


Read Users' Comments ( 0 )

Related Posts Plugin for WordPress, Blogger...