Thomas Nielsen's Black bottom bracing


Black bottom bracing? 

Why black? "Black" seems to be quite a favourite colour in hi-fi world. A lot of the hi-fi equipments as you can see are black in colour, not to mention the "black saucers" that we are spinning on our beloved TT's are mostly black too!

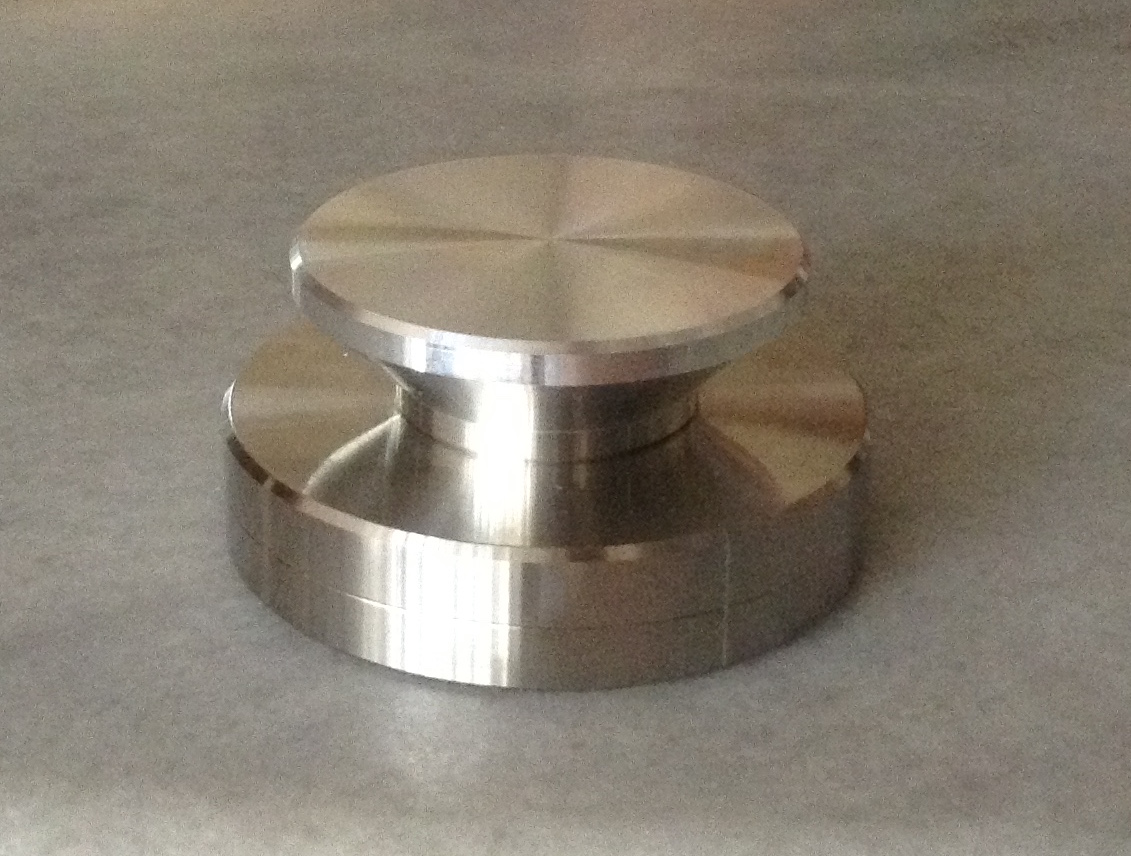
But you don't find black bottom bracing in my list. Yes, so far I only supply the natural stainless steel bottom bracing. The is because stainless steel is hard to be chemically stained to "perfect black". At most we can get it darkened like the picture below only:


Here's how Thomas has got his bottom bracing with "well-done black". How did he manage to do so? The answer is simple, just Spray it

It's perfectly fine to do so as it is not going to affect your TT performance. In fact it's cheaper and more effective compared to getting it "chemically stained". Good DIY idea from Thomas of Denmark for you!

Let's hear what Thomas has to say about the bracings and aluminium feet upgrades : 


Hi Michael! 

Just to tell, that I am very pleased with the bracing upgrade - and the alu feets looks really cool. I am glad that I got them too! 

About the sound enhancements: 

My initial impression is: "It's like windows being polished". 

Small nuances in the background is brighter and the sound is tightened up, and dynamics seems to "pop up" faster than before. 


By the way: I had a small amount of matte black paint in a spray can, so I gave the bottom brace and the big shim some black spray before the assembly. 


The reason for this is, that my TT is located on the Rega wall bracket in good operative height. And from my favorite listening position in the sofa I can see slightly underneath the TT, and therefore I wanted to make the bottom brace more discreet compared to the black bottom of the TT - and it just gets the alu feets to stand out even more beautiful! 

So maybe a black option of the bottom brace would be an idea for future "upgraders" 

Best regards from Denmark
Thomas Nielsen


Thanks Thomas!

* Stay tuned .... more to follow ....


Read Users' Comments ( 0 )

Mike's Stainless Steel dual pulley upgrade ......


Mike of California told me he has already got a few other upgrades done to his RP3 when enquiring on my aluminium feet and stainless steel dual pulley upgrades. He is looking at my stainless steel dual pulley because some other metal pulley upgrade is not performing to his satisfaction.

As I have mentioned earlier, stainless steel pulley (dual or standard) would give sonic improvement over aluminium and plastic pulleys due to better energy transfer, it's in fact a worthwhile upgrade to consider. And now, Mike is enjoying "huge difference" as he put it....

Here's Mike's feedback and pictures of his system:


Hello Michael,

I just wanted to write you a quick note to thank you for your excellent quality products. 

I know I only purchased the dual pulley and the feet for my RP-3, but they have made a huge difference. And I must say, your dual pulley is superior to the other ones out there


I have also added these other following modifications to my Rega RP-3: Rega TT-PSU, Ortofon 2M Bronze Cartridge, Michell Technoweight, Subplatter (Gus Argentina), Dual Pulley (Michael Lim), (2) Rega White Belts, Q-UP Auto Tonearm Lifter, Herbies Way Exc II Mat, Aluminum Isolation Feet (Michael Lim), and a Rega 3-pt Tonearm Spacer. 


Thank you again for your wisdom and great products! 

Best, 
Mike 


Thanks, Mike.


Read Users' Comments ( 0 )

Andrew Stockton of United Kingdom has a red hot RP6 too. He has just added dual pulley with silicone belts upgrade to his TT. An easy job which took him only 10 minutes with the pulley puller! I hope his testimony would clear the doubts of those who worry about the pulley installation. His step by step procedure with pictures are as follows:


Dear Michael 

I received the Rega Dual Pulley, belts and pulley puller two days ago. Fast (tracked) delivery to the UK and extremely well packaged. Very impressive.

I followed your instructions: 

  • Light oil applied on the motor shaft below the original pulley 
  • A layer of absorbent tissue placed below the old pulley (i.e. flat to the surface of the plinth). This was layered from 4 sides to overlap up to and all around the spindle 
  • A cotton bud lightly soaked in Acetone (my wifes’ nail varnish remover) gently dabbed over the top centre of the old pulley and left to soak for a few minutes 
  • The pulley puller was slid under the old pulley / above the tissue and tightened slowly with the allen key until the pulley was completely removed from the spindle 
  • The remaining ‘glue’ was carefully cleaned from the spindle (making sure no pieces fell below onto the top motor housing bearing) 
  • After this the new pulley was pushed up and down freely on the spindle to make sure it was smooth Then it was simply a case of finally sliding on the new pulley, tightening the allen bolt slightly to allow movement up-down and aligning the two belts to the correct height, then fully finger tightening the bolt and….finished 


All in all, about 10 minutes, very easy.

As others have noticed, pitch stability sounds much better, especially noticed on sustained notes and keyboard instruments. Bass is tighter sounding (i.e. transients are a little sharper) and ‘rumble' appears less. I am very happy with this change and wholeheartedly recommend others to consider the same. After all, the cost is small compared to the quality you offer and the perceived results.


Another good Idea here! How to keep dust away from plinth and record and prevent the lid from vibrating while playing record with lid closed!


The white edging is hollow rubber ‘door sealant’ as I like to play music with the lid closed. 


Rega RP6 / Ortofon 2M Black / Graham Slee Reflex M phono 


This keeps dust from the plinth/records and reduces vibration being transmitted from the cover. All my vinyl is RCM cleaned and in very good condition and I like to keep it that way !)  

Best regards 
Andrew 


Thanks, Andrew!


Read Users' Comments ( 0 )

Some time last year, while I was strolling in the weekend flea market (a perfect place to hangout during weekends for retirees) with my wife, I met Jepson and a few other Hi Fi enthusiasts. As usual, the whole group of us had a good time chatting away in our favourite cafe which was strategically in the middle of the ground floor in Amcorp Mall.

Amazingly, the cup of black coffee and the two slices of ultra crispy kaya butter toast bread seemed to taste especially delicious today, "flavoured" with all the Hi-Fi or TT talks and jokes! 


Just before the Lunar New Year, I was glad to hear from Jepson again. He was looking at my underslung counterweight for his Michelle Tecnodec turntable with Rega RB250 tonearm. He has recently retired from work (he is a veteran in Hi-Fi industry) and he is looking forward to enjoy more of his favourite music now. 

After setting up the counterweight, Jepson sent me his feedback with pictures without delay. I really appreciate his effort and kindness. 


The VTF not fine tuned yet but i can hear better definition now. 


Even my wife hears it. 


The cart is the dynavector 10x5 high out mc 


Wish i have a digital gauge. Spent the afternoon listening to various records. I adjusted the vtf by ear and feel. 


First off, better definition across the board. Images more solid. There's even slam! 

Well done bro. 


And Jepson had asked me some questions on how to fine tune the VTF using 4.5g thumbscrew weight and these tips may be useful to you:

Hi Jepson,

Let say your requirement is 2.2g. Turn the 4.5g thumbscrew weight 5 or 6 turns anti-clockwise from it's inner most position(i.e. completely screwed into the stub position), you proceed to adjust the VTF to around 2.1g or as close as you can get by moving the counterweight( the one with a plastic locking wheel). Then do the fine adjustment by turning the 4.5g thumbscrew weight clock-wise( looking from the stub end) until you get the desired value. 

Best regards, 
Michael 


Jepson commented about this fine tuning feature( and I am a bit flattered!):

This feature is execellent! So versatile. Michelle tecnoweight lost out to u on this. My sound now has more air. Bass more definition. 

Thanks Mike. Bravo! 

I attached some pics of my tt and hifi setup.


My hifi equipment: 
Michell Tecnodec tt 
Adrian Wong's local phono stage 
Lindemann integrated Amp 
Sonus Faber Cremona speakers 
diy Canare interconnects 
diy Canare speaker cables                                                                                                                            


Thanks Jepson, Enjoy more analog music!


Read Users' Comments ( 0 )

Related Posts Plugin for WordPress, Blogger...